Agent Install & Configuration
A Cimitra Agent is deployed to any of the servers, computers or devices you want to run commands or scripts on. Cimitra Agents are deployed after you have implemented a Cimitra Server.
Broad Platform Support
The Cimitra Agent comes in a variety of platforms. There is a native Cimitra Agent for the following platforms:
Windows
Linux (x86)
MacOS
Other platforms compatible with Node.js (ARM Processors for example)
The Cimitra “Other” Agent type is a Node.js variant that was created so that if you can get Node.js onto your computer/device, you can deploy the Cimitra Agent for Node.js. For example, a Raspberry Pi is a Linux ARM architecture, so it requires the Cimitra “Other” Agent type.
NOTE: Currently there is not a sustainable method for deploying the Cimitra Agent on the ChromeOS platform. Also, deploying a Cimitra Agent on a mobile platform such as iOS or Android is not practical, and is beyond the purpose and design of the Cimitra Agent.
Manual or CLI Install
Manual Install Method (10 Minutes)
Manually installing a Cimitra Agent on average takes about 5 to 10 minutes to define, download and run the Cimitra Agent install routine. The Manual Install method is useful for the following reasons:
1. The Command Line Install method fails
2. On Windows, you want to install a second instance of the Cimitra Agent
3. On Windows, you have an older version of PowerShell (less than 5.x)
Command Line Install – CLI Method (30 Seconds)
The fastest and easiest way to define and install a Cimitra Agent is using the “Command Line Install – CLI” installation method.
The CLI method works well on all *NIX platforms, and is definitely the preferred method for deploying a Cimitra Agent. On the Windows platform, the CLI method only works on platforms that have PowerShell Version 5.x or greater. That is pretty much Windows 10 and Windows Server 2019.
Windows
Windows Agent Install Methods
There are 2 different ways to install the Cimitra Agent for Windows
1. Manually: Works every time, takes about 10 minutes
2. Command Line: Works in most modern Windows environments, takes about 10 to 30 seconds
Windows Agent Manual Install Method
[CLICK HERE FOR WINDOWS AGENT DOCUMENTATION]
The Windows Agent documentation details how to install the Cimitra Agent for Windows manually. The Command Line Install Method only works on the most modern Windows platforms.
Windows Agent Command Line Install Method
If you are deploying the Cimitra Agent on a Windows 10 or Windows 2019 Server, or newer computer with PowerShell 5.x or greater, you can use the command below to install the Cimitra Agent for Windows. Copy and paste the command below, and modify it to match your Cimitra system:
[EXAMPLE BELOW – MODIFY THE SERVER, PORT AND CREDENTIALS]
iwr https://git.io/JclcC -o .\agent.ps1 ; .\agent.ps1 cimitra.example.com 443 [email protected] mySecretPassword
Or if you do not want to pass the user and password on the command line, you will be prompted for them if you use this syntax:
[PROMPT FOR CREDENTIALS]
iwr https://git.io/JclcC -o .\agent.ps1 ; .\agent.ps1 cimitra.example.com 443
The command above downloads and runs a script that installs the Cimitra Agent. The script will prompt for credentials.
[SPECIFYING AN AGENT NAME]
iwr https://git.io/JclcC -o .\agent.ps1 ; .\agent.ps1
cimitra.example.com 443 -Name MyFavoriteWindowsBox
[SPECIFYING AN AGENT NAME AND INSTALLING CIMITRA’S WINDOWS USER ADMIN PRACTICE]
iwr https://git.io/JclcC -o .\agent.ps1 ; .\agent.ps1
cimitra.example.com 443 -Name MyFavoriteWindowsBox -CimitraWinUserAdmin
[INSTALLING MULTIPLE AGENTS VIA WINDOWS SERVICE INSTANCE]
By default when the Cimitra Agent is installed, it’s Windows Service Name is: Cimitra. If you would like to create separate Cimitra Agents to the same Windows Server you can use a unique “Instance name” for the Cimitra Agent in Windows Services using the…
-Instance
…parameter. See the example below:
iwr https://git.io/JclcC -o .\agent.ps1 ; .\agent.ps1
cimitra.example.com 443 -Instance ACME_DENTAL
[POST-INSTALLATION STEPS]
[CLICK HERE FOR WINDOWS AGENT DOCUMENTATION]
You will likely need to read the Cimitra Windows Agent documentation to complete the process of deploying a Cimitra Agent on Windows. For example, you generally want to run the Cimitra Windows Agent Service as a specific user. There may also be PowerShell script execution rights that you need to set.
There are also some advanced topics such as defining a second Cimitra Agent instance.
Linux Platforms
Linux Agent Command Line Install Method
If you are deploying a Cimitra Agent on a Linux computer, you can install the Agent from a command line in the following manner:
[Short Syntax]
-OR-
[Long Syntax]
[EXAMPLES]
[Short Syntax]
curl https://git.io/Jclma -L -o ./agent.sh ; chmod +x ./agent.sh ; ./agent.sh cimitra.example.com 443 [email protected] mySecretPassword
[Long Syntax]
curl https://raw.githubusercontent.com/cimitrasoftware/agent/master/cimitra_agent_install.sh -o ./agent.sh ; chmod +x ./agent.sh ; ./agent.sh cimitra.example.com 443 [email protected] mySecretPassword
Or if you do not want to pass the user and password on the command line, you will be prompted for them if you use this syntax:
[PROMPT FOR CREDENTIALS]
curl https://git.io/Jclma -L -o ./agent.sh ; chmod +x ./agent.sh ; ./agent.sh cimitra.example.com 443
curl https://raw.githubusercontent.com/cimitrasoftware/agent/master/cimitra_agent_install.sh -o ./agent.sh ; chmod +x ./agent.sh ; ./agent.sh cimitra.example.com 443
The command above downloads and runs a script that installs the Cimitra Agent. The script will prompt for credentials.
[SPECIFYING AN AGENT NAME]
By default when a Cimitra Agent is installed, the name of the agent is the hostname of the computer you are installing the Cimitra Agent to. If you would like to specify the name of the agent use the name= option. For example:
[Short Syntax]
curl https://git.io/Jclma -L -o ./agent.sh ; chmod +x ./agent.sh ; ./agent.sh cimitra.example.com 443 name=MyFavoriteLinuxBox
[Long Syntax]
curl https://raw.githubusercontent.com/cimitrasoftware/agent/master/cimitra_agent_install.sh -o ./agent.sh ; chmod +x ./agent.sh ; ./agent.sh cimitra.example.com 443 name=MyFavoriteLinuxBox
[SYSTEMD]
If you want to make sure that the Cimitra Agent installs as a systemd process vs. an init.d process add the systemd command line option:
[Short Syntax]
curl https://git.io/Jclma -L -o ./agent.sh ; chmod +x ./agent.sh ; ./agent.sh cimitra.example.com 443 systemd
[Long Syntax]
curl https://raw.githubusercontent.com/cimitrasoftware/agent/master/cimitra_agent_install.sh -o ./agent.sh ; chmod +x ./agent.sh ; ./agent.sh cimitra.example.com 443 systemd
Linux Agent Manual Install Method
You may have a good reason to install the Cimitra Agent on Linux manually. Below is documentation on how to do so.
[CLICK HERE FOR LINUX AGENT DOCUMENTATION]
[POST-INSTALLATION STEPS]
There is also some advanced topics such as exchanging SSH keys for doing things such as running a Cimitra Agent on Linux Box 1 which can then run commands on Linux Box 2. Read the documentation below for more information.
[CLICK HERE FOR LINUX AGENT DOCUMENTATION]
MacOS Platforms
MacOS Agent Command Line Install Method
If you are deploying a Cimitra Agent on MacOS, you can install the Agent from a command line in the Terminal application in the following manner:
[SYNTAX]
curl https://git.io/Jclma -L -o ./agent.sh ; chmod +x ./agent.sh ; ./agent.sh (cimitra server address) (ip port) (admin level user) (admin password)
[EXAMPLE]
curl https://git.io/Jclma -L -o ./agent.sh ; chmod +x ./agent.sh ; ./agent.sh cimitra.example.com 443 [email protected] mySecretPassword
Or if you do not want to pass the user and password on the command line, you will be prompted for them if you use this syntax:
[PROMPT FOR CREDENTIALS]
The command above downloads and runs a script that installs the Cimitra Agent. The script will prompt for credentials.
[SPECIFYING AN AGENT NAME]
By default when a Cimitra Agent is installed, the name of the agent is the hostname of the computer you are installing the Cimitra Agent to. If you would like to specify the name of the agent use the name= option. For example:
curl https://git.io/Jclma -L -o ./agent.sh ; chmod +x ./agent.sh ; ./agent.sh cimitra.example.com 443 name=myFavoriteMac
MacOS Agent Manual Install Method
You may have a good reason to install the Cimitra Agent on MacOS manually. Below is documentation on how to do so.
[CLICK HERE FOR MACOS AGENT DOCUMENTATION]
Other Platforms
Other/Node.js Agent Command Line Install Method
If you are deploying a Cimitra Agent on a platform such as a Raspberry Pi for example, you can install the Agent from a command line in the following manner:
[SYNTAX]
curl https://git.io/Jclma -L -o ./agent.sh ; chmod +x ./agent.sh ; ./agent.sh (cimitra server address) (ip port) (admin level user) (admin password)
[EXAMPLE]
curl https://git.io/Jclma -L -o ./agent.sh ; chmod +x ./agent.sh ; ./agent.sh cimitra.example.com 443 [email protected] mySecretPassword
Or if you do not want to pass the user and password on the command line, you will be prompted for them if you use this syntax:
[PROMPT FOR CREDENTIALS]
The command above downloads and runs a script that installs the Cimitra Agent. The script will prompt for credentials.
[SPECIFYING AN AGENT NAME]
By default when a Cimitra Agent is installed, the name of the agent is the hostname of the box you are installing the Cimitra Agent to. If you would like to specify the name of the agent use the name= option. For example:
curl https://git.io/Jclma -L -o ./agent.sh ; chmod +x ./agent.sh ; ./agent.sh cimitra.example.com 443 name=MyPi
Other/Node.js Agent Manual Install Method
There are some platforms that require the Other/Node.js Cimitra Agent. The compiled Cimtra Agents are not compatible with ARM processors. So the Node.js Cimitra Agent was created to address these types of devices. An example of an ARM processor device is a RaspBerry Pi. We have deployed the Cimitra Agents to both a Raspberry Pi 3 and a Raspberry Pi Zero W. Cool stuff!
Read more in the documentation below.
[CLICK HERE FOR NODE.JS AGENT DOCUMENTATION]
Agent Control Commands
Windows
Use the Windows “Service” commands as follows:
To stop the Cimitra Agent on use the command:
Stop-Service cimitra
To start the Cimitra Agent use the command:
Start-Service cimitra
Get-Service cimitra
Windows Agent Command Line Install and the “cimitra” command
If you install the Cimitra Agent for Windows using the Command Line Install (CLI) method, the “cimitra” command is installed. If you deployed your the Cimitra Agent for Windows manually, you can manually install the “cimitra” command by using the following method:
iwr cimitra.com/cimitra.ps1 -OutFile .\cimitra.ps1 ; .\cimitra.ps1 -i
NOTE: This command is only compatible with PowerShell 5.x or better.
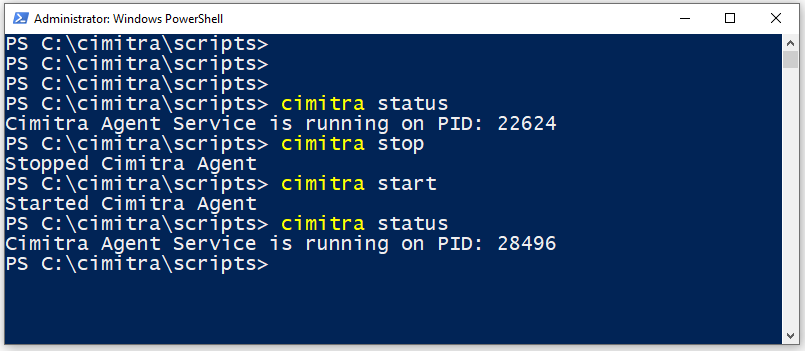
After a successful installation of the “cimitra” command when you open up a new PowerShell session, the base command is:
cimitra
To stop the Cimitra Agent use the command:
cimitra stop
To start the Cimitra Agent use the command:
cimitra start
cimitra status

Linux, Mac, Other platforms
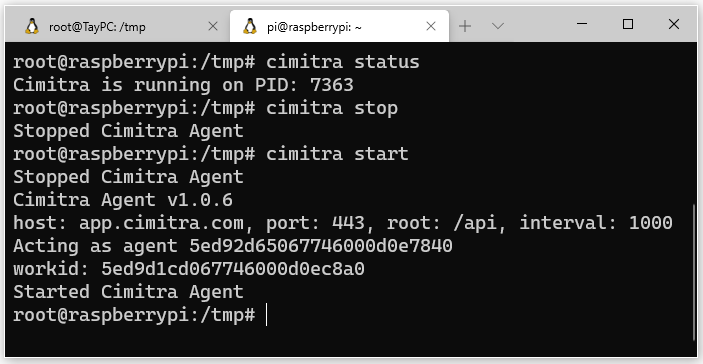
The Cimitra Agent Command Line Installation installs a script for easily controlling the Cimitra Agent. The base commands is:
cimitra
To stop the Cimitra Agent use the command:
cimitra stop
To start the Cimitra Agent use the command:
cimitra start
cimitra status

Keeping Agents Up
Windows & Mac
The Cimitra Agent on the Windows and the MacOS platform runs as a service. So if the Cimitra Agent were to come down unexpectedly, you can configure the service manager for Windows and Mac so that it will make sure to restart the Cimitra Agent automatically.
Linux
Linux environments need a little bit more help to assure that the Cimitra Agent stays up persistently.
For this reason the Cimitra Agent has an Agent Control Script/Module that can assist in making sure that the Cimitra Agent is up. The command is simply
cimitra agent checkup
cimitra get agent
And then you can use the command:
cimitra agent checkup
cimitra agent stop
cimitra agent checkup
Creating Cimitra Actions
Once you have established a Cimitra Agent on a computer, you can tie commands and scripts that you have downloaded or created to Cimitra “Actions” in Cimitra Web Administration.
There is much more documentation on establishing Cimitra Actions within Cimitra Web Administration at the main Cimitra Admin Help site:
https://www.cimitra.com/adminhelp
Linux Computers – Importing Actions
In Linux environments when you establish a Cimitra Agent a utility called the Cimitra Import Module was installed which can assist you in easily importing commands and scripts into the Cimitra System. To use the Cimitra Import Module issue the following command in a terminal session.
cimitra import
cimitra get import
And then you can use the command:
