Cimitra Server Install & Setup
Instructions for a Cimitra Server Installation and Post Installation Configuration
NOTE: Roll to the bottom of this page for a video tutorial demonstrating the Cimitra Server installation process.
Server Requirements
The Cimitra Server installs as a Docker Container. So the platform you use should be compatible with Docker.
Although Cimitra runs as a Docker Container, to run Cimitra you don’t need to know any Docker commands! The only command you ever need to issue is:
cimitra
The most native platform for Docker is a Linux platform. For example Ubuntu desktop or Server. When people ask “what should I install Cimitra on”, we always say “Linux in a VM“.
Notes For The Curious
You do have more options for installation platforms, the Cimitra Server has been successfully tested and deployed on:
- Several Linux server and desktop platforms (2018 Versions or better)
- MacOS with Docker Desktop
- Windows 10 with WSL2 and Docker Desktop
- Windows Server 2019 with WSL2 and Docker Desktop
NOTE: Installing the Cimitra Server on a non-Linux computer is viable if you install and define an external instance of MongoDB that the Cimitra Server will be configured to use. See the Server Architecture section for more guidance on defining an external instance of MongoDB.
The Cimitra Server has 3 Docker Containers that it uses.
1. Server
2. Client
3. Database
All 3 Docker Containers can be loaded and unloaded without any data loss. The reason for this is that all of the Cimitra data is kept in a MongoDB database which is kept on the local disk of the host that is running Docker and the Cimitra Server Docker Containers or in an external instance of MongoDB.
The Cimitra Server will require an additional 4 GB of memory on the server that hosts the Cimitra Server. If you are creating a new Linux host to host the Cimitra Server, a proper amount of RAM is 12 GB. Allow for 100 GB of disk space for database growth. On a Linux box, the Cimitra Server stores it’s database data in the following location:
/var/lib/docker/volumes/server_mongodata
Pre-Installation Actions
1. Make sure to establish a static IP address for the server that will host the Cimitra Server.
2. Assign a DNS Address for the server that will host the Cimitra Server.
Server Installation
Once you have made sure that the computer that will house the Cimitra Server can host Docker, then the installation of Cimitra is a one-line command.
In a shell session on the box that you are installing the Cimitra Server perform the following two commands:
#1. “sudo su” to get in as the root user.
#2. Copy and paste the “curl -fsSL . . . | sh” command below into your terminal.
sudo su
-OR-
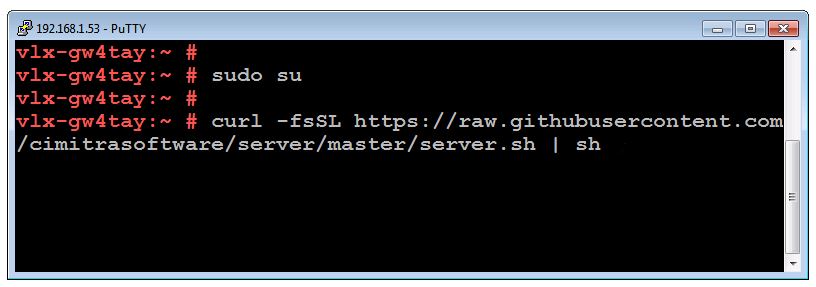
NOTE: If script fails, and you take an action to remedy the issue, run the command again just as you did before.
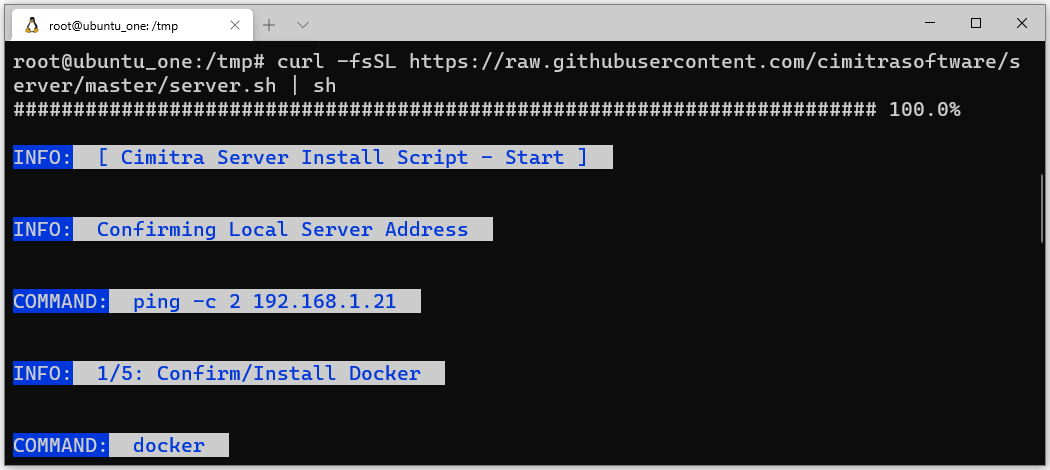
The command above downloads and runs a script that installs the Cimitra Server. The script informs you along the way what it is doing and which commands it is calling.
The Cimitra Server installation script does the following:
- Installs or confirms the installation of Docker
- Installs or confirms the installation of the docker-compose utility
- Downloads and imports the Cimitra Docker containers from Docker Hub
- Implements a Cimitra Agent on the same server where the Cimitra Server is being installed
- Installs supporting Cimitra API Modules for easy control of the Cimitra Server and Cimitra Agent processes.
- On Linux platforms, the “Cimitra Import Module” is installed for easily creating Cimitra Apps from the Command Line
- Creates some Cimitra Apps that can be modified and duplicated for easily creating more Cimitra Apps
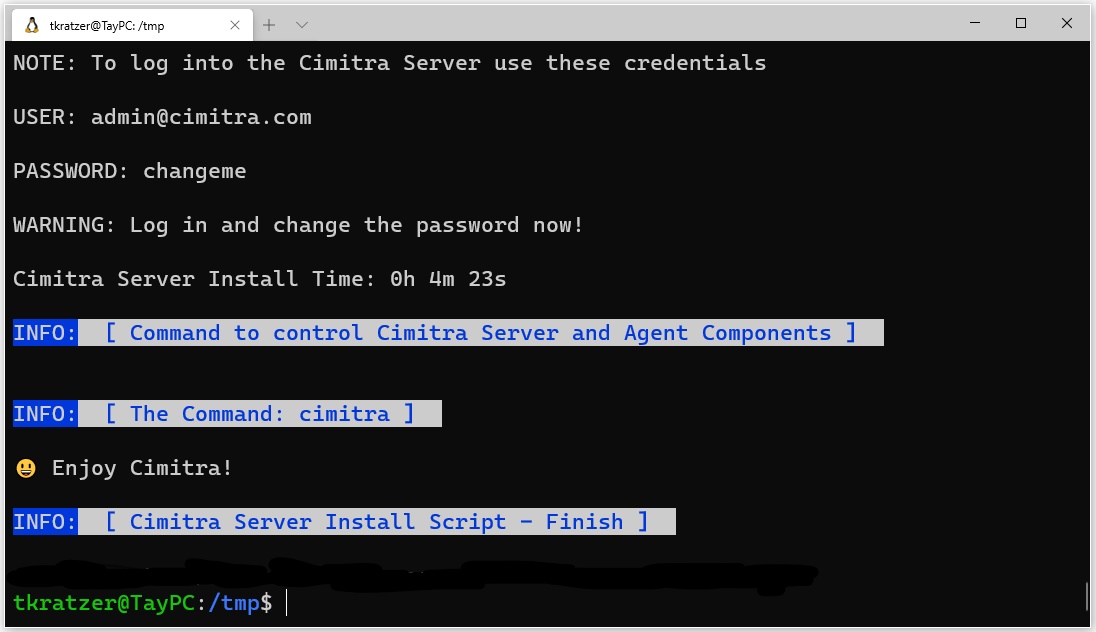
User: admin@cimitra.com

Post-Installation Actions
Make sure to change the password for the default admin account.
User: admin@cimitra.com
The default userid’s email address can be changed to something that more closely matches your organization’s system and email addresses.
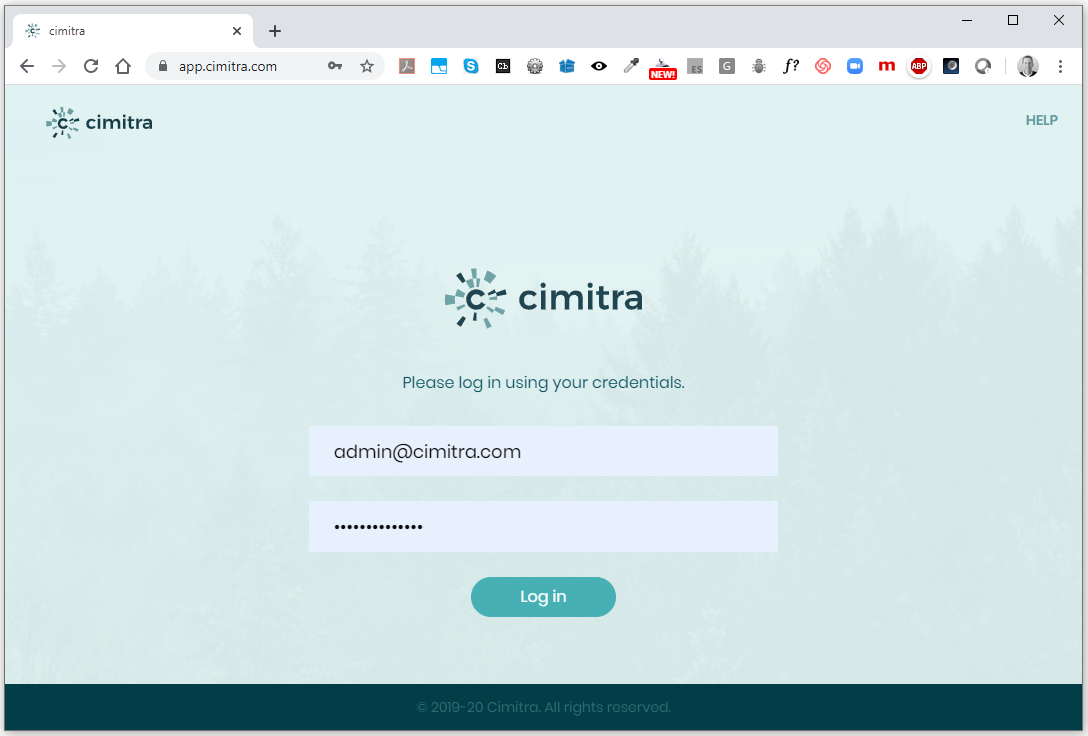
The Cimitra Web Client should be accessible at your server’s address. By default it will be something like this:
https://[server address]
When the Cimitra Server Installation ran, it detects if port 443 is taken. If port 443 is already taken by another process listening on port 443, the install configures the Cimitra Server to run on port 444. Thus the Cimitra Server may be at the following address:
https://[server address]:444
Implementing an SSL Certificate
Once a DNS name for the Cimitra Server has been established, follow these steps to define the SSL certificates with properly signed certificates.
1. Place the SSL certificate and key file in the following directory:
/var/opt/cimitra/server/certs
2. Edit the Cimitra Server Configuration file:
/var/opt/cimitra/server/docker-compose.yml
. . . and modify the following three lines
BEFORE
#volume:
# – ./certs/cimitra.crt:/etc/ssl/certs/server.crt
# – ./certs/cimitra.key:/etc/ssl/private/server.key
AFTER
volume:
– ./certs/<your certificate file>.crt:/etc/ssl/certs/server.crt
– ./certs/<your key file>.key:/etc/ssl/private/server.key
EXAMPLE
volume:
– ./certs/cimitra.crt:/etc/ssl/certs/server.crt
– ./certs/cimitra.key:/etc/ssl/private/server.key
NOTE: The dash before the certificate and key name should remain.

Restart The Cimitra Server
After saving the docker-compose.yml file, the Cimitra Server should be restarted to incorporate the new changes.
The command to restart the Cimitra Server is:
cimitra server restart
Authentication Strategies
By default Cimitra has a simple and secure authentication method.
Cimitra also supports both LDAP and DUO Multi-Factor Authentication. If you have an LDAP compliant directory such as Microsoft Active Directory or Micro Focus eDirectory or other directories, Cimitra integrates with these directories via LDAP.
Cimitra supports Multi-Factor Authentication via DUO. DUO provides 10 free accounts, which makes it simple to implement a Multi-Factor Authentication solution in a short amount of time.
You can design your Authentication Strategy to use LDAP and DUO MFA Authentication combined into one Authentication Strategy.
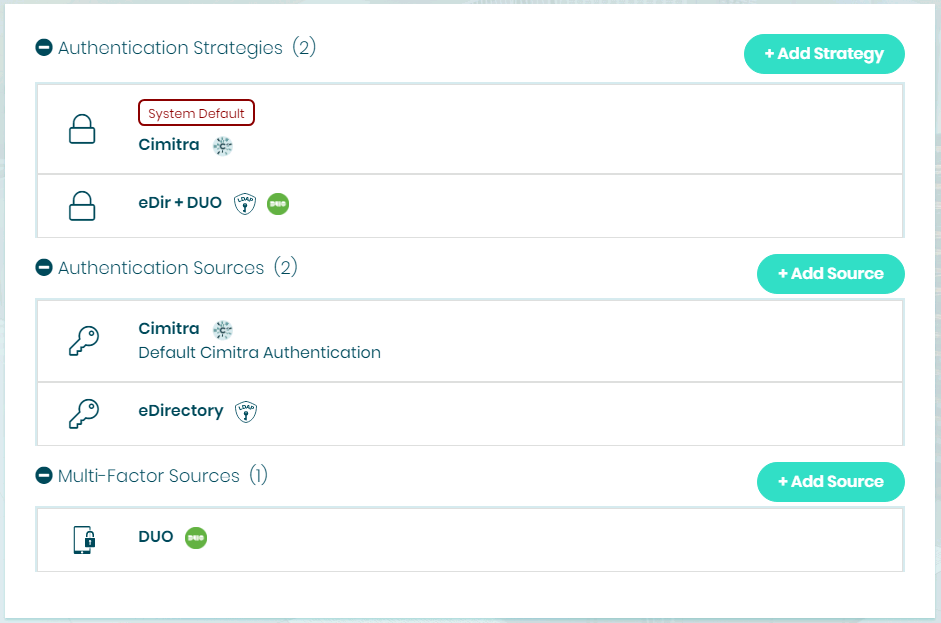
Configuring LDAP Authentication
To set up LDAP Authentication while logged into the Cimitra Web Administration client as an Admin-level user:
1. Select Settings | Authentication
2. Next to Authentication Sources select Add Source
3. For Authentication Type select LDAP
4. Name the Authentication Source
5. Under LDAP Servers select Add Server
6. Add as many LDAP Servers you would like for failover purposes
a. If you intend to use SSL/TLS, the LDAP server certificate cannot be self-signed.
b. If you have a self-signed certificate, then use port 389 authentication.
7. Save the newly created Authentication Source
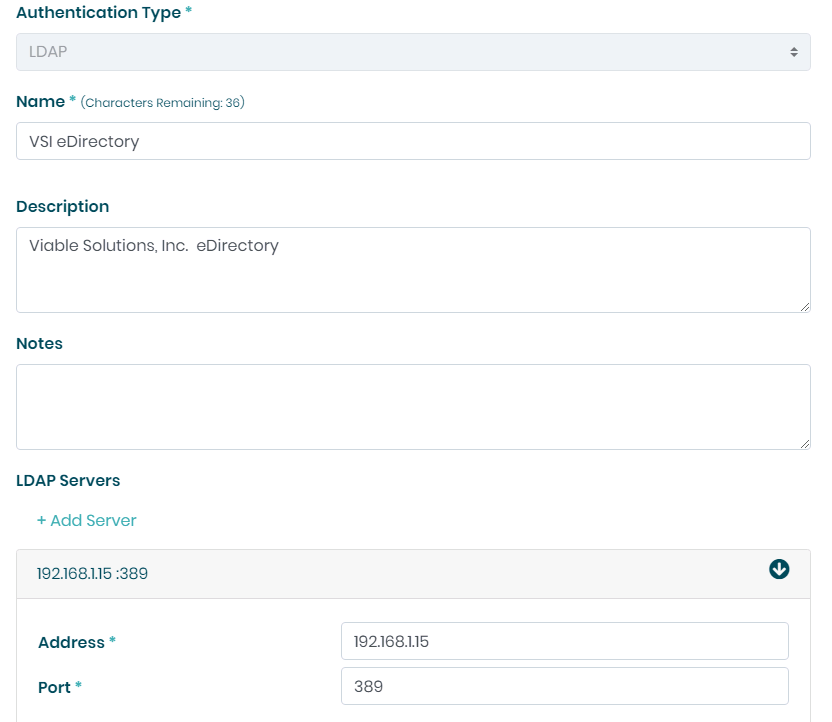
Now that you have defined an LDAP Server you need to create an Authentication Strategy to include the newly created LDAP Authentication Source.
8. Next to Authentication Strategies select Add Source
9. The Authentication Source should be the LDAP Authentication Source you created in the steps above.
10. Select the Create button.
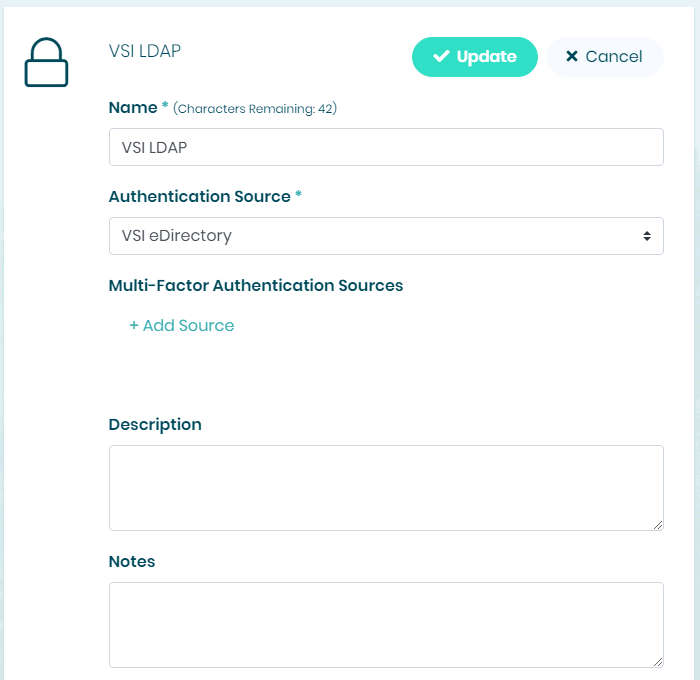
Now that you have created an Authentication Strategy, you can assign that Authentication Strategy to any of the users you want using LDAP Authentication. To do so, do the following.
11. Edit a User object, and change their Authentication Strategy to match the Authentication Strategy you made in Step 8.
12. Fill in the LDAP Distinguished Name field to match the LDAP identity of the user you are editing. For example:
cn=Eliot,OU=USers,OU=ServerSupt,O=VSI
13. Save the user object

14. Test authentication.
NOTE: Cimitra allows for an extremely flexible LDAP authentication architecture. For example, you can define multiple LDAP directories in the same Cimitra System.
Configuring DUO/MFA Authentication
Before setting up DUO/MFA Authentication in Cimitra, you must first establish an account for your organization at DUO’s Admin Dashboard,
Once you log into DUO’s Dashboard, choose Protect an Application the type will be “Partner Auth API” which is the Application you will use with Cimitra.

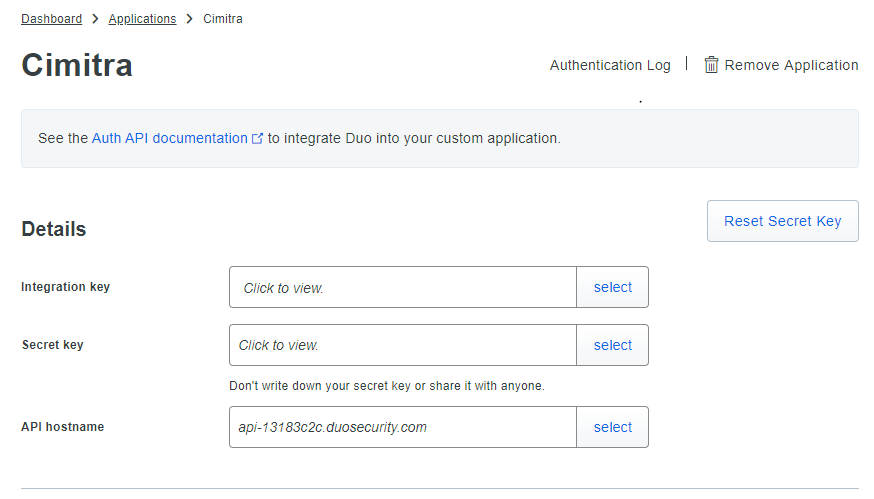
Once you have setup DUO correctly, then establish DUO/MFA Authentication in the Cimitra Web Administration client while logged in as an Admin-level user.
Select Settings | Authentication
1. Next to Multi-Factor Sources select Add Source
2. For Multi-Factor Type select Duo Security
3. Name the Multi-Factor Source
4. Fill in the remainder of the fields based on the DUO Application you previously created in DUO’s Admin Dashboard
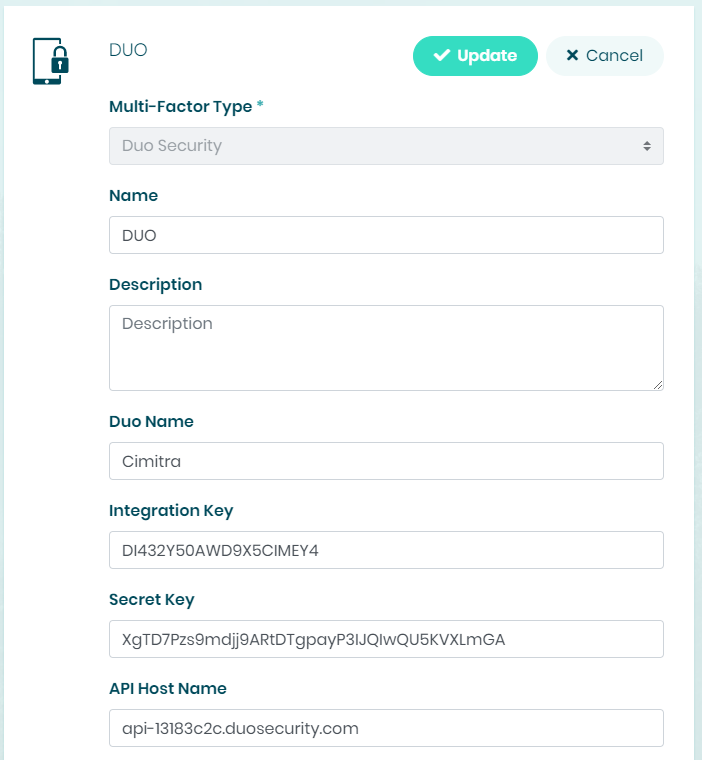
Now that you have defined a Multi-Factor Source you either need to create an Authentication Strategy -or- Add the Multi-Factor Source to an existing Authentication Strategy. This example explains how to add a new Authentication Strategy that then incorporates the new Multi-Factor Source.
5. Next to Authentication Strategies select Add Source
6. The Authentication Source could be either a Cimitra Authentication Source or an LDAP Authentication Source.
7. Choose the Add Source option and then choose the DUO MFA that you created in Step 1.
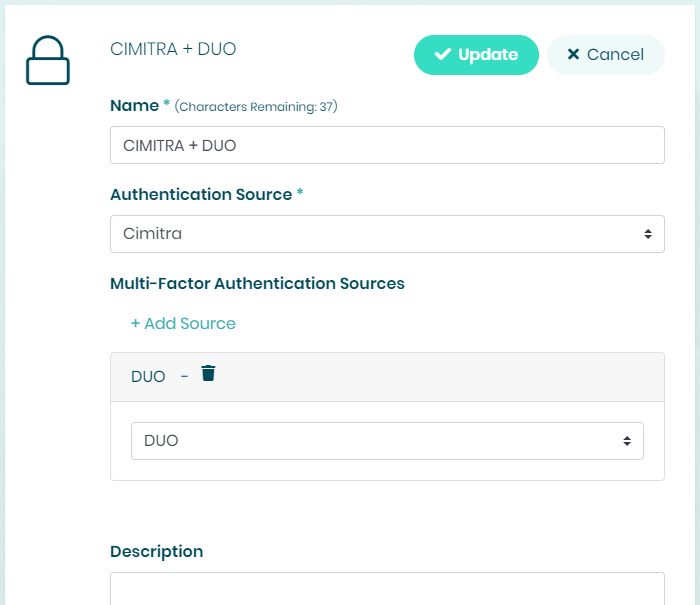
8. Choose Update to save the newly modified Authentication Strategy.
9. If you created a new Authentication Strategy, edit a User object, and change their Authentication Strategy to match the Authentication Strategy you made in Step 7.
10. Save the user object and test MFA authentication.
NOTE: Cimitra allows for an extremely flexible MFA authentication architecture. For example, you can assign more than one DUO Multi-Factor Source to the same Cimitra Authentication Strategy.
Deploying Cimitra Agents and Creating Actions
There are 2 programmatic components in a Cimitra system. The Cimitra Server and Cimitra Agents.
Now that a Cimitra Server is deployed, the next step is to deploy Cimitra Agents on computers and devices where you have commands and scripts that you would like web console access to via Cimitra.
Once you have established a Cimitra Agent to a box, you can tie commands and scripts into Cimitra “Actions” (Previous versions of Cimitra called them “Apps”).
Once a Cimitra Action is created, it can be place in a Cimitra Folder and then the Cimitra Folder can be shared with people who should have access to the Cimitra Action.
Cimitra Server Control Commands
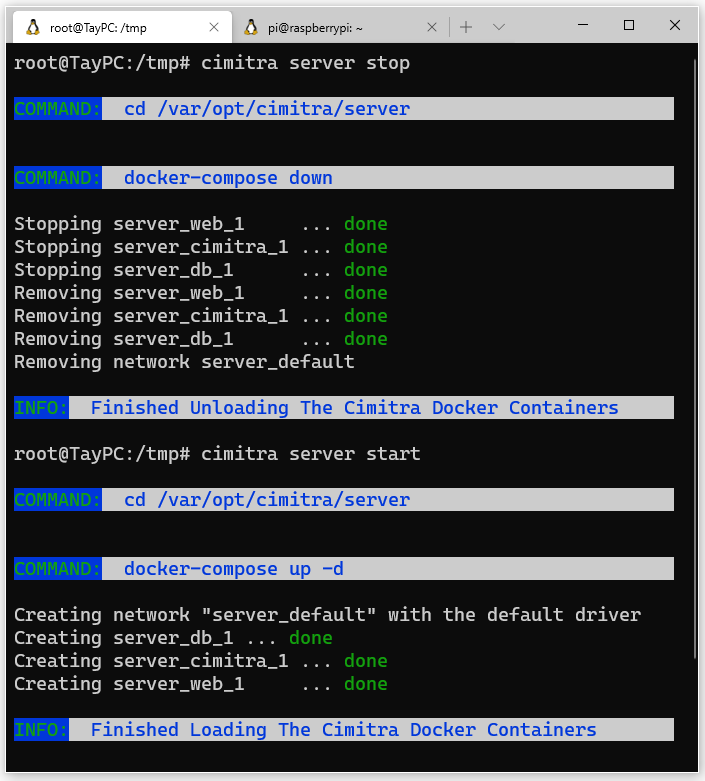
The Cimitra Server components are all Docker Containers. So they can be controlled with “docker-compose” commands. However the Cimitra Server Installation installs a script for easily controlling the Cimitra Server. The base commands is:
cimitra server
To stop the Cimitra Server use the command:
cimitra server stop
To start the Cimitra Server use the command:
cimitra server start
To check for upgrade the Cimitra Server use these 2 commands:
cimitra get server
cimitra server upgrade
The Cimitra Auditing Panel
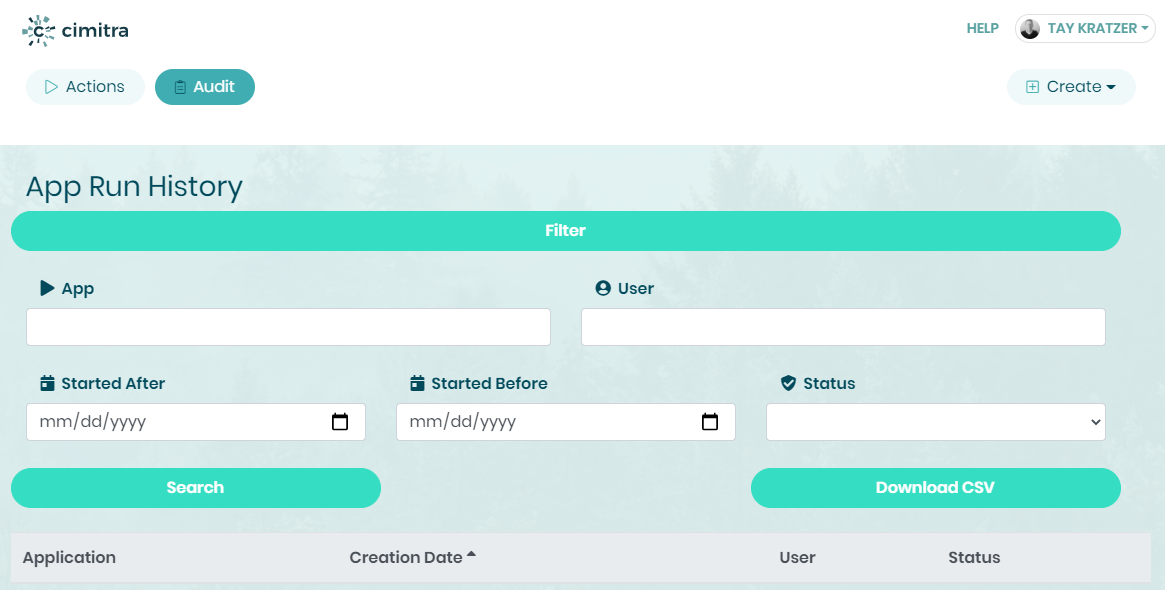
Cimitra has an easy-to-use and powerful Auditing Panel. The Auditing Panel only works if a Cimitra Server license has been implemented.
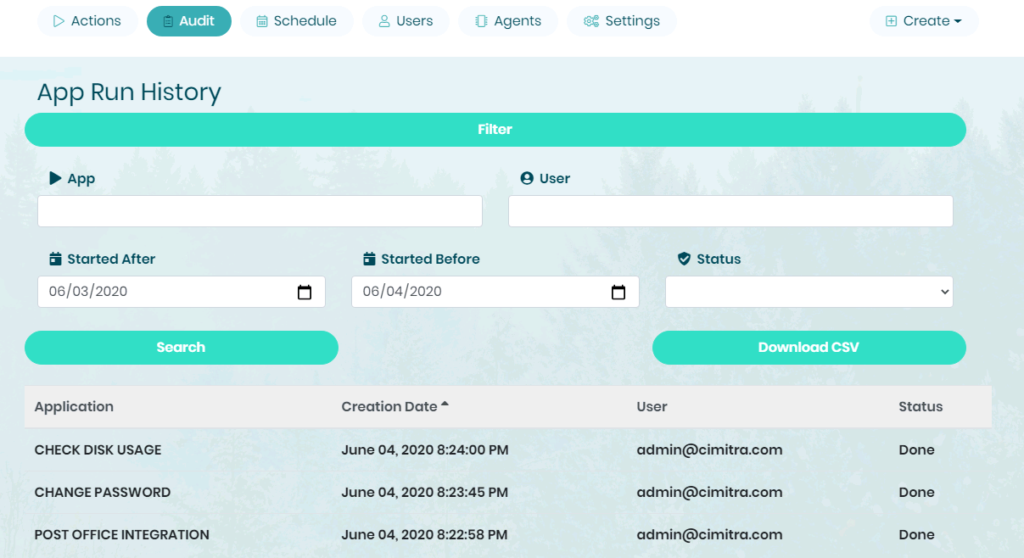
All Admin-Level users have access to the Auditing Panel. You can also designate other users who can have the ability to use the Auditing Panel without having Admin-Level access.
Designating Auditors
To give a user rights to be an Auditor, edit the User in Cimitra, and select the Auditor checkbox.
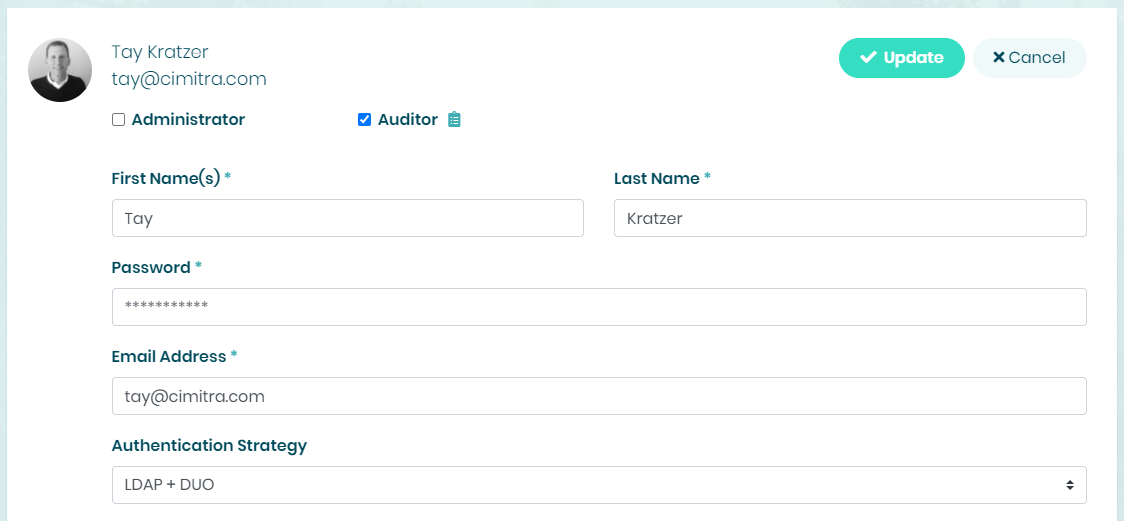
Once a user is an Auditor, the Auditing Panel will be available in the button bar at the top of the Cimitra Web Client.
Scheduling a Cimitra Action to Run (Cron)
Cimitra Actions can be scheduled to run at a certain time. When editing an Action, there is a field in every Action that allows for a Cron style schedule to be created. For ease-of-user, the Schedule Panel shows the Cimitra Actions with a Cron schedule associated with them. The Schedule Panel also allows for turning off and on Cron schedules rather than having to edit individual Cron schedules.
UTC TIME: The Cimitra Server is contained in a Docker Container that is set to UTC Time. So the time you specify should take into account the difference between your time zone and the UTC Time.
IMPORTANT NOTE: Make sure that Cron schedules are only associated with Cimitra Actions that do not require user input.
Example: Cron Schedule in a Cimitra Action

Example: Cron Schedule Panel

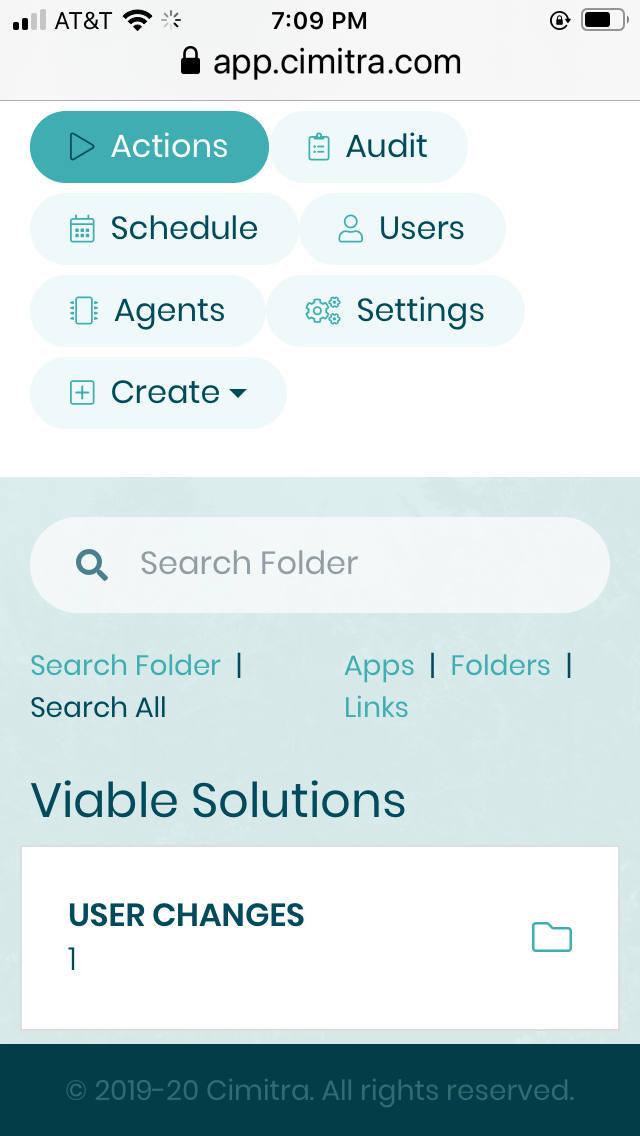
Cimitra’s Mobile Friendly Interface
The Cimitra Web Client is meant to be Mobile Friendly to even the smallest of screens. The screenshot below was taken on an iPhone SE (2016 Version).
Navigating The Cimitra Web Interface
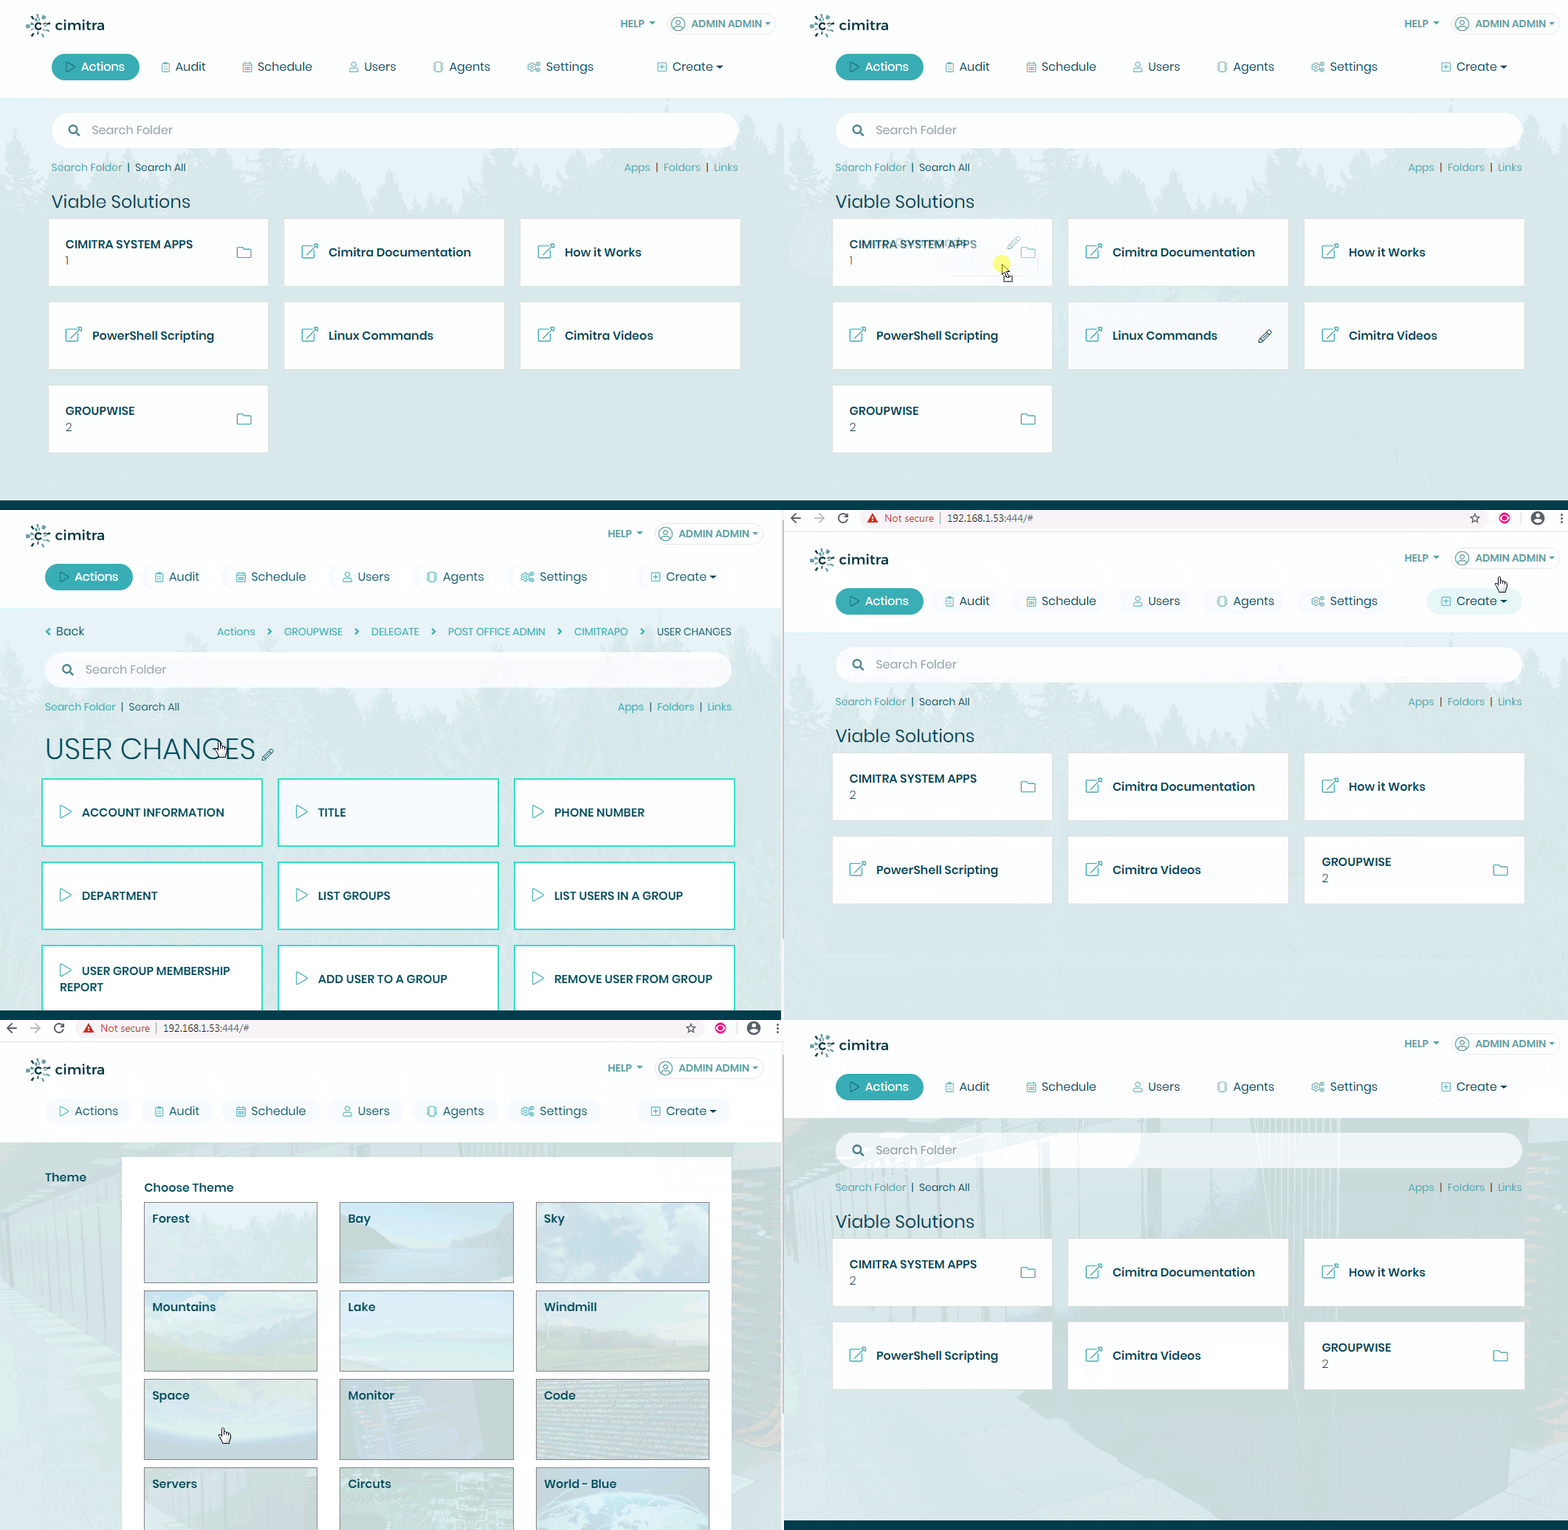
Drag and Drop
The Cimitra Web Client is designed to make ordering Cimitra Actions and Cimitra Links into Folders. An Action or Link can be dragged and dropped (with a mouse) into another folder.
Getting To Home
The graphic in the upper-left-hand corner is a quick “Go Home” method for getting to the main screen that you are presented with when you first log in.
Using the Back Button
The Cimitra Application is a “Single Page Application”. Which means you should never use your browser’s back option. Use the “Back” button you are presented with. You can also quickly navigate away from where you are currently at and still stay in same Cimitra Folder by selecting the “Actions” button.
Background Themes
Cimitra has pre-made Background Themes. Users can choose their own theme, by selecting “Theme” under their user login drop down.
Licensing The Cimitra Server
Obtain a license from Cimitra or your Cimitra Authorized Reseller. To establish contact with Cimitra, send an email to: contact@cimitra.com, or call or text our main number:
801-228-0785
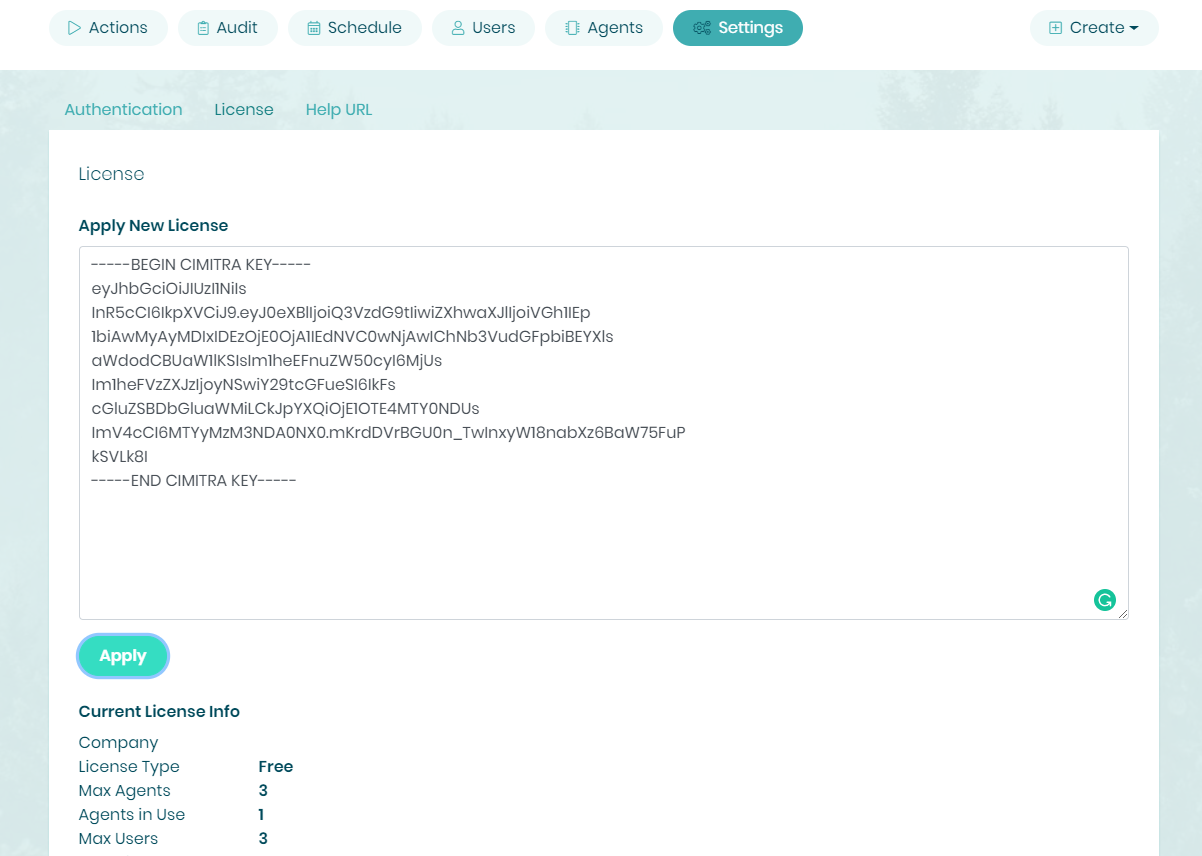
Once you obtain a license key, log in as an Admin level user, and go to Settings | License and paste in your license key and select Apply. Having a license will allow for 1. Auditing, 2. More Users, and 3. More Cimitra Agents.
Backing Up The Cimitra Server Database
NOTE: The steps outlined here are not necessary if you have defined an external source for your MongoDB database.
Everything you configure or change in the Cimitra Web Interface is kept in the Cimitra Server’s MongoDB database.
If your Cimitra Server is installed to a native Linux host, the MongoDB database is located at the path:
/var/lib/docker/volumes/server_mongodata/_data
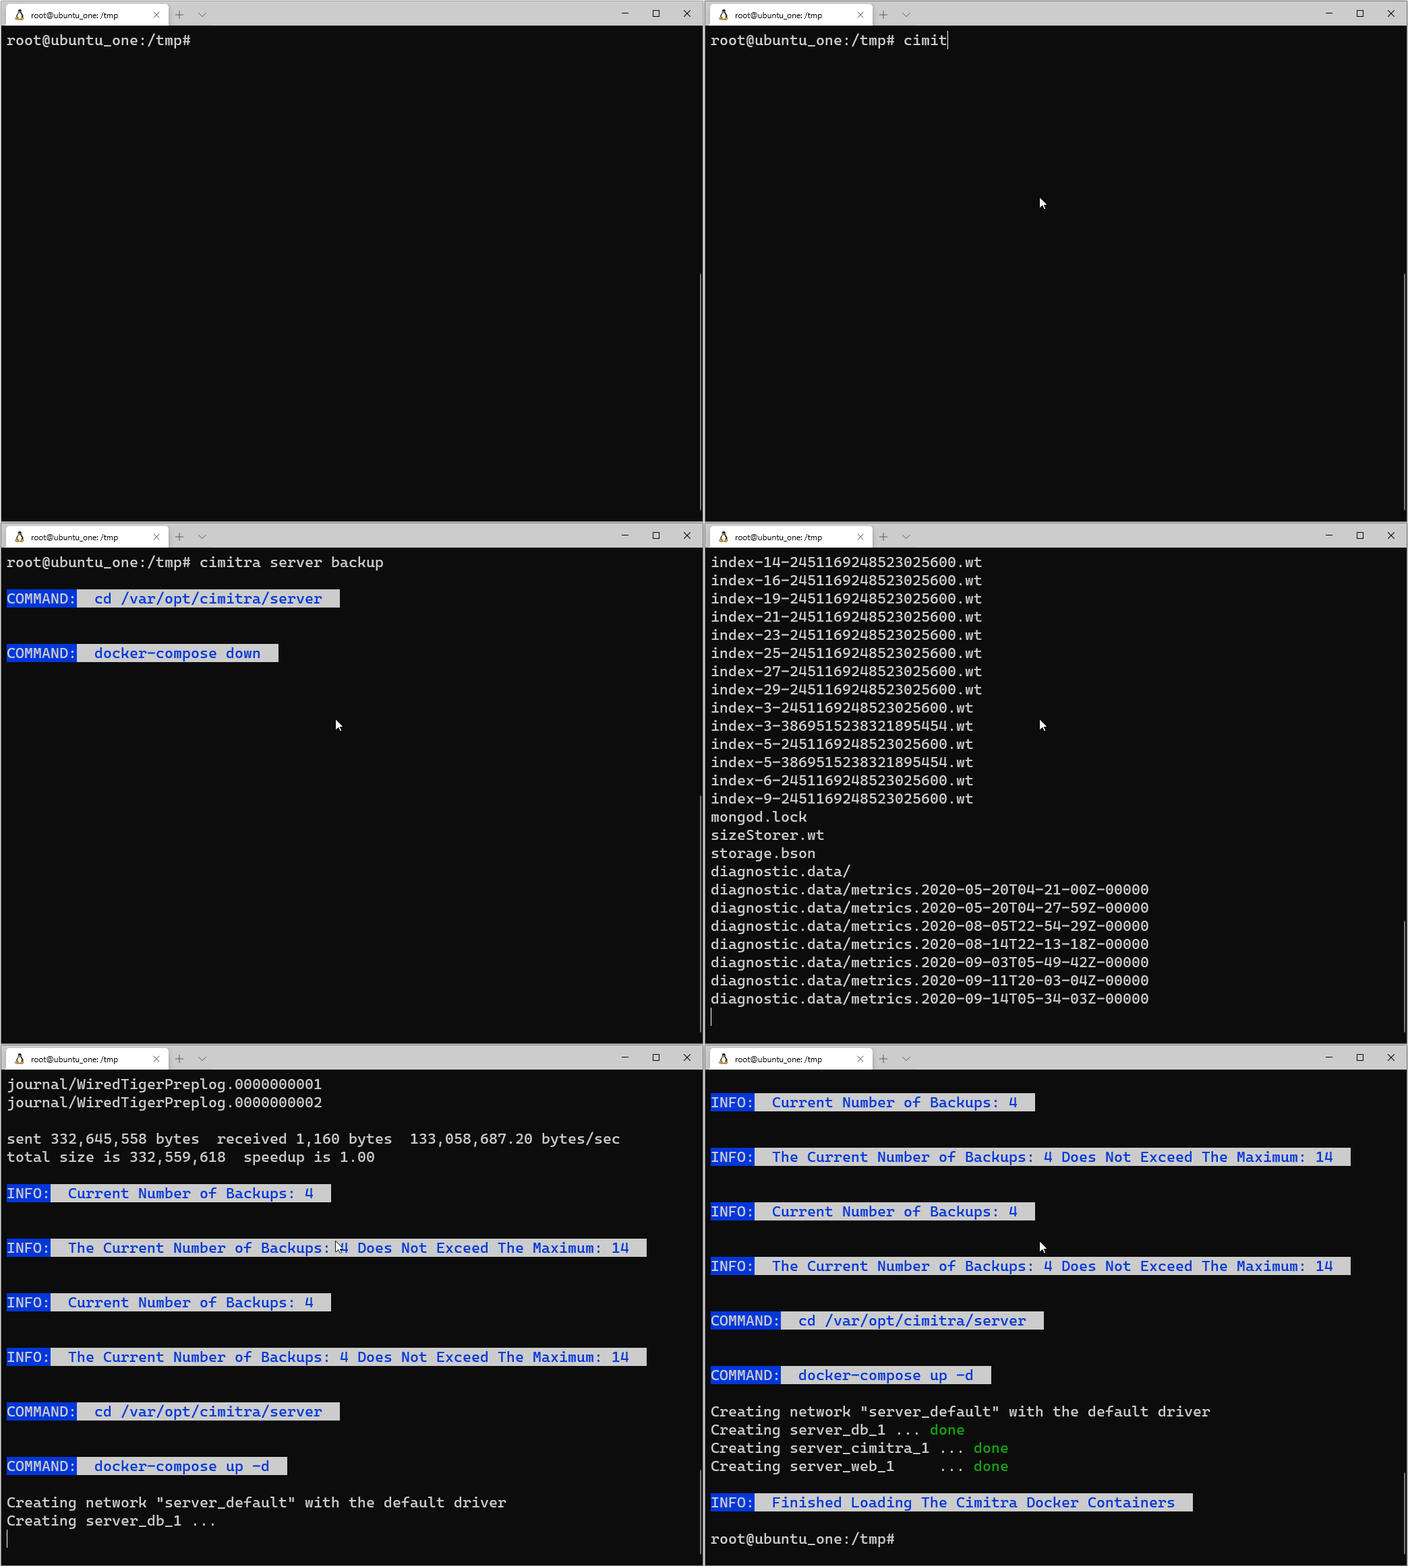
When the Cimitra Server is installed, the “cimitra server” command has a simple backup routine that uses Rsync to backup the MongoDB database at the path mentioned above.
To backup your Cimitra Server use the command:
cimitra server backup
NOTE: The backup command places the backups in the directory:
/var/lib/docker/volumes/server_mongodata/_backup
Automating Backups With a Cimitra Scheduled (Cron) App
Once you have tested the “cimitra server backup” command and know how it works and how much each backup takes, you should consider creating a Cimitra App with a Cron schedule defined for the App to run at an interval you would like. For example, perhaps you want a backup every day, or just once a week. Read more under the App Scheduling (Cron) section.
The Cimitra App should have the following:
Agent: <The Cimitra Agent that runs on the Cimitra Server>
Interpreter: None
Script/Command: cimitra server backup
NOTE: When you create a Cimitra App that runs the “cimitra server backup” command, the command will run, but since the Cimitra Server is restarted, the App run event will look as though it never completed, but it did. The Cimitra Agent just wasn’t able to send results of back to the server because of it’s brief downtime window during the backup routine.

Custom Branding The Cimitra Web Client
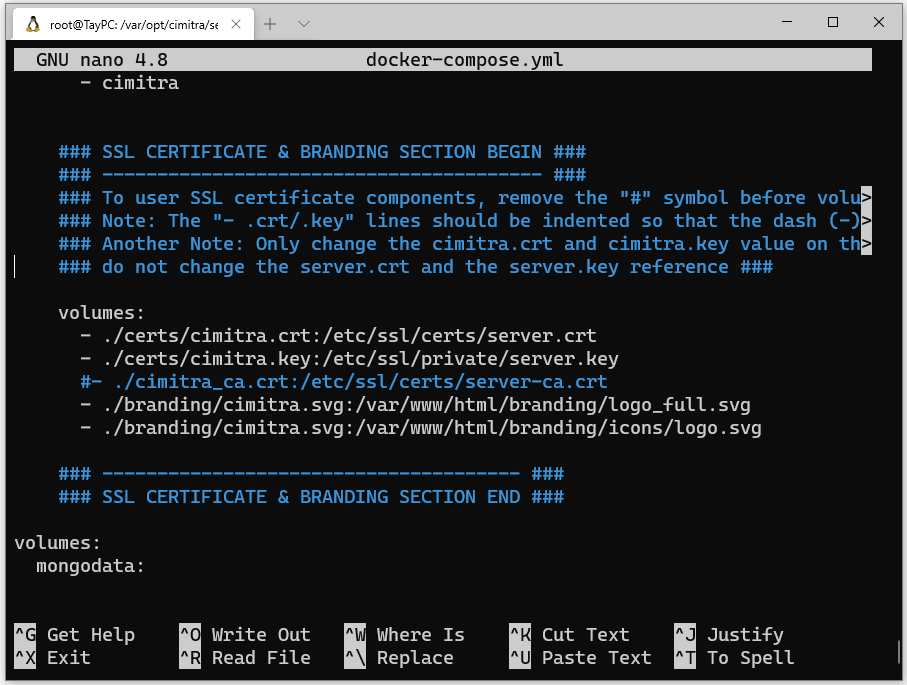
Obtain an .svg file representing for your brand/company/organization.
1. Place the .svg file in the following directory:
/var/opt/cimitra/server/branding
2. Edit the Cimitra Server Configuration file:
/var/opt/cimitra/server/docker-compose.yml
. . . and modify the following three lines
BEFORE
#volume:
# – ./branding/cimitra.svg:/var/www/html/branding/logo_full.svg
# – ./branding/cimitra.svg:/var/www/html/branding/icons/logo.svg
AFTER
volume:
– ./branding/cimitra.svg:/var/www/html/branding/logo_full.svg
– ./branding/cimitra.svg:/var/www/html/branding/icons/logo.svg
NOTE: The dash before the image names should remain.
Cimitra Server Architecture
Docker Components
The Cimitra Server is comprised of 3 Docker Containers that provide the following services.
1. The Server
2. The Database
3. The Web Client
The Docker Containers can be brought up and down at will.
The Cimitra Database
The Database Docker Container is using MongoDB. The MongoDB database is stored outside of the Database Docker Container. The location for the MongoDB database on a Linux Server such as SUSE or Ubuntu is:
/var/lib/docker/volumes/server_mongodata
Using an External MongoDB Database
Cimitra supports using an external MongoDB database on another server, external to the Cimitra MongoDB Docker Container. In fact, in instances in which the Cimitra Server is hosted on a Windows Computer or a Mac Computer, you should strongly consider installing MongoDB outside of the Docker Container and pointing Cimitra to external instance of MongoDB. This can be done in the following way.
Edit the Cimitra Server Configuration File:
/var/opt/cimitra/server/docker-compose.yml
. . . and modify the following line to reflect the address of your MongoDB database server and the database to use.
APPIT_DB_URL: mongodb://db/cimitra_prod
APPIT_DB_URL: mongodb://192.168.1.3/cimitra_prod
After saving the docker-compose.yml file, the Cimitra Server should be restarted to incorporate the new changes.
The command to restart the Cimitra Server is:
cimitra server restart
Scaling
The Cimitra Server can scale to as many users as your license allows. Once licensed, the Cimitra Server supports unlimited Cimitra Agents. A good rule of thumb is 50 Agents, as longs as you can see that the Cimitra Server is not getting sluggish.
If you require more Agents, than consider deploying a second Cimitra System along with a second Cimitra Server. There is an additional cost for each Cimitra Server.
Cimitra Repositories on Docker Hub and GitHub
The Cimitra Server and Agent are designed to be installed with ease from a command line. So accessing Cimitra components from a repository isn’t necessary.
However, some people would like to understand where the Cimitra Software is actually housed. There are two repositories for the Cimitra Software.
Cimitra Server Docker Components
The Cimitra Server Components are Docker Containers stored on Docker Hub.
At Docker Hub you can search for Cimitra and you will find the Cimitra Server and the Cimitra Web Client images. Cimitra uses a MongoDB Docker Container that is maintained by MongoDB.
Cimitra Installation Scripts and Modules
The Installation Scripts that install the Cimitra Server and the Cimitra Agent are all hosted at Cimitra’s GitHub site.
Cimitra API Documentation
The Cimitra Server has an API that can be made available. Some of the API documentation documents features that are not fully implemented. If the feature is implemented in the Cimitra Web Client, then you know the feature is fully implemented.
Exposing the Cimitra API Docs
The Cimitra API Documentation is not exposed by default. To expose the Cimitra API Documentation you must configure the docker-compose.yml file to expose the 5007 port. Following are instructions for doing so.
1. Stop the Cimitra Server with the command: cimitra server stop
2. Edit the docker-compose.yml file which is located in the directory:
/var/opt/cimitra/server
3. Look for the section that reads:
cimitra:
image: cimitra/server:rc
### ————————————- ###
### EXPOSE CIMITRA API DOCS BEGIN ###
#ports:
# – 5007:5007
### EXPOSE CIMITRA API DOCS END ###
### ————————————- ###
restart: always
environment:
Remove the two pound symbols in the ports section as follows:
### ————————————- ###
### EXPOSE CIMITRA API DOCS BEGIN ###
ports:
– 5007:5007
### EXPOSE CIMITRA API DOCS END ###
### ————————————- ###
NOTE: The dash symbol “-” before the “5007” should line up under the “r” in ports.
4. Start the Cimitra Server with the command: cimitra server start
5. To access the Cimitra Server API Documentation from a web browser, go to the following URL: https://<your cimitra server>/api/docs

Pre-Made Cimitra Actions/Scripts
Now that you have installed a Cimitra System, you might want to get a jump on Cimitra Actions and Scripts. We’ve made it easy for you to get 30 Cimitra Actions that are all ready to go.
Active Directory Cimitra Actions
We’ve created a bunch of PowerShell scripts and posted them on GitHub. However we’ve also made an installation process that will pull down the Active Directory management PowerShell scripts created at Cimitra, and wire them right into your Cimitra web panel.
Read more here:
Cimitra Active Directory High Level Documentation
Cimitra Active Directory Technical/Installation Documentation
Troubleshooting Docker
Cimitra masks the commands for controlling Docker via the “cimitra server” command. The goal being, to lessen the need to understand how to stop and start Docker containers. There may be occasions in which knowing how to control Docker directly can be useful, particularly in situations in which Docker might be misbehaving in some fashion. This document is largely a reference for common commands and procedures that Cimitra support has used when troubleshooting issues related to Docker. You may want to search out and learn Docker documentation from Docker’s website and other resources such as StackOverflow forums.
Docker Commands & Docker Daemon
The Docker Daemon/Service is the piece of software that does the following:
1. Stores and controls Docker Containers
2. Performs tasks that are initiated by the Docker control commands:
docker
and
docker-compose
The Docker Daemon on Linux can be stopped/started with these console commands:
systemctl stop docker
systemctl start docker
Starting the Cimitra Server Manually
Generally the following commands are used to start and stop the Cimitra Server
cimitra server stop
and
cimitra server start
These commands actually do the following:
cd /var/opt/cimitra/server
docker-compose up -d
and
cd /var/opt/cimitra/server
docker-compose down
So to control the Cimitra Server without using the “cimitra server“ Bash shell script from Cimitra, use the docker-compose commands as needed.
Listing Docker Images
Docker images are kind of like a Vmware image being hosted on a Vmware host server. List Docker images with the following command:
docker ps
The Cimitra Server is actually 3 Docker Images. The images are:
1. The Cimitra Server Service
2. The Cimitra Web Client Service
3. The Cimitra Database Service (MongoDb)
Each of these Docker Images can be individually stopped or started in the following fashion:
docker stop <image container id>
Example:
docker stop 347b88361c5e
In our system, this took down the Docker Container associated with the Cimitra Server Service. To start the Docker Container we use the command:
docker start 347b88361c5e
Removing Docker Images
Cimitra stores all it’d data outside of the 3 Docker Images discussed so far. So if the occasion should arise that you need to remove one or more of the Cimitra’s Docker Images, you can do so without any issues. The Docker Containers will simply be pulled down from DockerHub once you go to start the Cimitra Server again.
To remove an image use the following command:
docker rmi <image container id>
Example:
docker rmi 347b88361c5e
If you find that you cannot remove an image, you may have to employ other commands such as:
docker kill <image container id>
–force
See Docker documentation and Google for times in which you may want to employ these commands.
Surgically Removing a Docker Image
More than once, we have seen scenarios in which Docker doesn’t behave, and removing an image through traditional means and tools was impossible. We used the following procedure to remove a Docker Image that was damaged, and could not be removed in any other fashion. When we used the docker rmi <image container id> command Docker would give the error:
unknown error after kill: runc did not terminate
We found that the only way to remedy this issue was to:
NOTE: In our example, no other Docker Images were hosted on the Linux Server hosting Cimitra, so we didn’t need to concern ourselves with which components were Cimitra Docker Images and which were Docker Images for another piece of software.
1. Stop the Cimitra Server
2. Stop the Docker Daemon
3. Rename the directory where the Docker Daemon stores Docker Images
4. Start the Docker Daemon
5. Start the Cimitra Server, which re-downloads the Cimitra Server Docker Images
So here are the commands we used to accomplish this procedure on an Ubuntu 18 Server.
1. Stop the Cimitra Server
cimitra server stop
2. Stop the Docker Daemon
systemctl stop docker
3. Rename the directory where the Docker Daemon stores Docker Images
mv /var/lib/docker/image/overlay2/imagedb/content/sha256 /var/lib/docker/image/overlay2/imagedb/content/sha256.old
4. Start the Docker Daemon
systemctl start docker
5. Start the Cimitra Server, which re-downloads the Cimitra Server Docker Images
cimitra server start
Your system may have different paths, so this fix may not be a perfect fit, but you can apply the same principles.
Upgrades
NOTE: The latest version of the Cimitra Server was released on 12/24/2021
Upgrading the Cimitra Server
Determine if your Cimitra Server is up to date by going to the About page while logged in as an Administrative User. If you don’t see the About page under the Settings option, then you should upgrade your Cimitra Server.
Following is the procedure for upgrading your Cimitra server. At the Cimitra Server console type in these two commands:
cimitra get server
and
cimitra server upgrade
